


spiritnitro974
-
Compteur de contenus
1 749 -
Inscription
-
Dernière visite
Tout ce qui a été posté par spiritnitro974
-
 sauf par MYUS!
 -
putain la chance!! ouep ben j'ai besoin d'un b16b complet mais je pense que l'envoye au US revinedrais moin chere que Japon-Reunion!!
-
Rasso QG snaccking 17 ou 18 Decembre
spiritnitro974 a répondu à un(e) sujet de spiritnitro974 dans Meetings | Rencontres
 ben je fait deja un prix j'ai dit plus haut je vais pas donne non plus
 -
annulé
-
 700€ putin joyeux noel alors!
 -
 celui la c'est le meme http://technabob.com/blog/2011/11/30/miniature-functional-v12-engine/
 -
je sais pas si c'est le meme http://www.autoblog.com/2008/10/08/mini-v12-rc-car-engine-produces-not-mini-power/
-
mode fatigue je pense ausi a un moteur de modélisme pour une reproduction identique
-
 meme sans del sol tu peut venir la passion c'est pas la voiture dalon!
 -
il fait pipi dedans pour faire avancer
-
band de cochonnnnn allez HS OFF j'espere que notre ami n'est pas traumatisé!! et qu'il sera la pour la sortie nocturne
-
tant que c'est bridé mi aime comme ca mi pousse a elle a boute
-
Annonces véhicules sur LEBONGROIN.FR
spiritnitro974 a répondu à un(e) sujet de sbouby1 dans Ventes de véhicules
 http://www.japancar.fr/forum/viewtopic.php?printertopic=1&t=125032&postdays=0&postorder=asc&vote=viewresult
 -
Dominicale: Grillades Janvier 2012 p.2
spiritnitro974 a répondu à un(e) sujet de Sham dans Meetings | Rencontres
 moi aussi je boycotte alors
 -
Annonces véhicules sur LEBONGROIN.FR
spiritnitro974 a répondu à un(e) sujet de sbouby1 dans Ventes de véhicules
http://www.leboncoin.fr/voitures/264921198.htm?ca=26_s moche mais le prix est correcte je trouve aprés faut voir si néna pas de vis caché! -
Annonces véhicules sur LEBONGROIN.FR
spiritnitro974 a répondu à un(e) sujet de sbouby1 dans Ventes de véhicules
http://www.leboncoin.fr/voitures/264927985.htm?ca=26_s low rider is possible marmay -
Annonces véhicules sur LEBONGROIN.FR
spiritnitro974 a répondu à un(e) sujet de sbouby1 dans Ventes de véhicules
Je croit que le gars de ste marie m'as dit que c’était 450€ pour les 16" mais j’appellerais pour vérifié:! -
Annonces véhicules sur LEBONGROIN.FR
spiritnitro974 a répondu à un(e) sujet de sbouby1 dans Ventes de véhicules
je vais appeler demain pour voir les tarif! -
Annonces véhicules sur LEBONGROIN.FR
spiritnitro974 a répondu à un(e) sujet de sbouby1 dans Ventes de véhicules
Voila je suis pas un myto http://www.leboncoin.fr/equipement_auto/257105428.htm?ca=26_s COORDONNEES AF AUTO TUNING Ste-Marie : 33 rue montée des Veuves 97438 Tél : 0262 53 89 52 Fax : 0262 58 01 12 St-Louis : 65C rue Sarda Garriga 97450 Tél /Fax : 0262 35 44 07 HORAIRES D'OUVERTURE Du Mardi au Samedi De 09h00-12h00 & 14h00-17-30 -
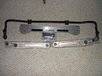 6th Gen (6G) Honda Civic - ITR 22mm Rear Swaybar and ASR Subframe Brace Install Article By George Belton One of the best suspension modifications you can do to improve the way your Civic handles would have to be upgrading or adding a rear sway bar. Unfortunately, the sub frame on Civics tends to rip, or tear out, if you go much bigger than the 13mm bar that comes on the Si model Civic. There are a couple products available that address this issue, and this article is going to focus on installing one such product from A-Spec Racing. ASR has designed a very beefy sub frame brace that prevents the tear out normally associated with using large sway bars. I am going to show you how to install this brace in a 6th gen Civic to support a 22mm sway bar from an Integra Type-R. In this install, I am also adding aftermarket Lower Control Arms...mostly for the ‘bling’ factor, though they are a bit lighter than stock and will replace the worn out bushings in the OE arms. Items to gather before you start: - jack and jack stands - blocks for front wheels - lug wrench - torque wrench - ratchets - 12mm, 14mm, & 17mm sockets - 14mm open ended wrench First off, here is the ASR Brace, the ITR Sway Bar, and the Omni Power Lower Control Arms. I also made some End Links out of Aurora Aluminum Rod Ends, and purchased Grade 8 hardware to secure them. Due to a shipping error I ended up with one red and one silver end link; however, since I employ the logic of function over form…I shook that one off. Before you start, go ahead and loosen the lug nuts on the rear wheels so they can be removed once you have the car in the air...this will make it much easier to work on the suspension, especially if you are replacing the LCAs. Now you can block the front wheels, jack up the rear of the car, and support it on jack stands...please make sure to use jackstands. Once you have the car up and supported, go ahead and remove the rear wheels. This step is optional, but removes a big load, frees up some room, and generally makes the work much easier. Alright, if you are changing the LCAs out, then you will need to remove both of these bolts...they are both 14mm in OE trim. Next you will need to remove these two bolts to get the LCAs off...these are again 14mm...you need to remove them whether or not you are changing LCAs. You should now be looking at the bare subframe. This not so thick sheet metal is the reason big sway bars rip the sub frame to pieces. Here we can compare the shiny new Omni Power LCAs to their OE counterparts. Notice they are the same length and the holes line up...that means these will not correct camber, though some aftermarket LCAs do correct camber. The Omni LCAs are mainly for the 'Bling' factor, though they are a bit lighter and come with new bushings. Here we also see the ASR kit with the hardware laid out. Go ahead and get the ASR Brace and the LCAs in place using the longer, beefier LCA bolts supplied by ASR. Only put these in finger tight for now. Next, if you removed the LCAs you need to get them attached back to your damper and the trailing arm. You might notice that the trailing arm does not want to line up. You can either push/pull the trailing arm into place, or use a hammer...I opted for a dead blow hammer. Once you get the holes lined up go ahead and put the OE bolt back in finger tight. Now you will need to get the ASR backing plates in place...this helps spread the load out across a larger area. (This is not required on a Si model because there is a backing plate welded in from the factory. Go ahead and get the lower backing plate bolt in place. Then get the upper bolt in place to get the backing plate aligned correctly, and go ahead and tighten the lower backing plate bolt to 22 lbf-ft. Here you can begin to see how this brace helps to spread the load. Now you are ready to add the sway bar. You can use OE 99-00 Si end links, but we opted for heim joint type end links and pieced our own together. ASR also has this type available as a kit for an additional $70. The ASR kit comes with these aluminum spacers that basically act as metal bushings for your sway bar. I am using grade 8 hardware, with a 'thick' washer on each side of the swaybar. From right to left - bolt, end link, thick washer, ASR spacer, swaybar, ASR spacer, thick washer, split washer, & self locking nut. You will torque this all down to 22 lbf-ft. I opted for Energy Suspension Graphite Impregnated Polyurethane bushings for the sway bar. These are 7/8" (22mm) universal fit and include zerk fittings so you can grease them. I had some ES Formula 7 grease left over from a Master Bushing install...and decided to lube these guys up. To secure the sway bar you will need to remove the top and bottom bolts on the ASR brace, line up the sway bar brackets, and get the bolts back in place finger tight. You can see the ES grease on the bar around the bushing. I just greased the bar and slid the bushing back and forth a few times. Slide the bar back and forth until your end links are in the correct position...then you will probably have to adjust the length to get them lined up with the holes in your control arms. Go ahead and get your end links attached to the LCA...but do not tighten them up yet. With rod end type end links, you will need to space them out from the control arm a bit...I used three thick washers for this. It looks a bit crooked, but do not worry, once we lower the car and tighten them up they will straigten out. Speaking of lowering the car...go ahead and re-install your wheels and get the car back on the ground. Now we need to torque the bolts to spec. LCA bolts = 40 lbf-ft End Link bolts = 22 lbf-ft Sway Bar Bushing bolts = 20 lbf-ft All done. If you replaced the LCAs and banged on your trailing arms at all, then an alignment probably wouldn't hurt. You do need to make sure and torque your lug nuts back to 80 lbf-ft though You can find the full article with links to larger images HERE.
 -
Annonces véhicules sur LEBONGROIN.FR
spiritnitro974 a répondu à un(e) sujet de sbouby1 dans Ventes de véhicules
Superbe etat ca part vite ces truc la!! -
Voitures que vous avez violé! Vos moments plaisirs au volant
spiritnitro974 a répondu à un(e) sujet de spiritnitro974 dans Midnight...
 desolé je suis pas un essayeur
 -
Voitures que vous avez violé! Vos moments plaisirs au volant
spiritnitro974 a répondu à un(e) sujet de spiritnitro974 dans Midnight...
ben j'essaye partout pourquoi il faut un endroit défini? -
H comme Honda, elle est là oufff
spiritnitro974 a répondu à un(e) sujet de Kheops dans Votre voiture et vous
 ou sans tomate
 -
Voitures que vous avez violé! Vos moments plaisirs au volant
spiritnitro974 a répondu à un(e) sujet de spiritnitro974 dans Midnight...
jumbo ou ca??